
Making maki sushi at home transforms an expensive restaurant treat into an affordable, customizable feast. This foolproof recipe combines traditional Japanese techniques with popular Hawaiian-style variations, giving you perfectly tight rolls filled with fresh ingredients every time. Whether you’re craving classic cucumber rolls or adventurous spam musubi-style maki, you’ll master the art of sushi rolling in under 90 minutes.
Why This Maki Sushi Recipe Works?
The Secret to Perfect Maki
The magic lies in properly seasoned sushi rice that’s sticky enough to hold together but not mushy. Our recipe uses the perfect ratio of rice vinegar, sugar, and salt to create that authentic sushi rice flavor. Plus, we’ll share the restaurant trick of keeping a bowl of vinegar water (tezu) nearby to prevent sticky hands – a game-changer for smooth rolling.
What Makes This Recipe Special?
Unlike other maki sushi recipes that stick to traditional fillings, we embrace both Japanese authenticity and Hawaiian creativity. You’ll learn to make everything from classic hosomaki (thin rolls) to Hawaii-style maki featuring local favorites like spam and pineapple. Our step-by-step instructions ensure even first-timers achieve restaurant-quality results.
Ingredients You’ll Need
Main Ingredients (with why each matters)
For the Sushi Rice:
- 2 cups Japanese short-grain rice (creates the perfect sticky texture)
- 2¼ cups water
- 1 piece kombu (adds umami depth)
- ⅓ cup rice vinegar (provides signature tang)
- 3 tablespoons sugar (balances acidity)
- 1½ teaspoons salt (enhances all flavors)
For the Rolls:
- 4-6 sheets nori (roasted seaweed)
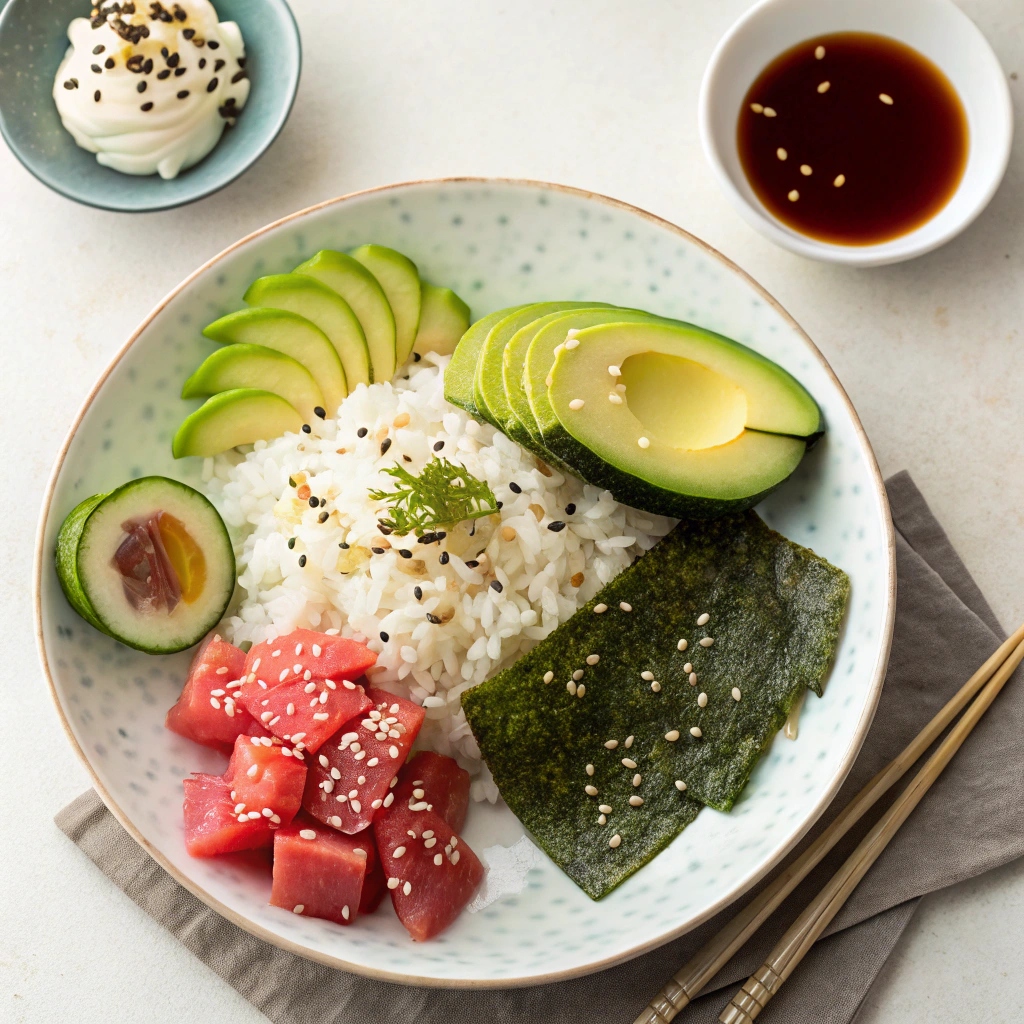
- 1 medium cucumber (adds refreshing crunch)
- 1 ripe avocado (provides creamy richness)
- 8 oz sushi-grade tuna OR canned tuna OR spam (protein options)
- 2 tablespoons mayonnaise (for spicy variations)
- 1 tablespoon sriracha (optional heat)
- Sesame seeds for garnish
Pantry Staples
- Soy sauce or tamari for serving
- Pickled ginger (gari)
- Wasabi paste
- Furikake seasoning (for Hawaiian style)
Best Substitutions That Actually Work
Can’t find Japanese rice? In a pinch, medium-grain rice works, though the texture won’t be quite as authentic. No fresh tuna? Canned tuna mixed with mayo creates a budget-friendly alternative. For vegetarian options, try our Grilled Tofu cut into strips, roasted shiitake mushrooms, or julienned carrots. Brown rice enthusiasts can substitute it for white rice – just extend cooking time to 45 minutes and expect a nuttier flavor.
Essential Equipment
- Bamboo sushi mat (makisu) – essential for tight rolling
- Sharp chef’s knife – crucial for clean cuts
- Rice paddle or wooden spoon
- Large shallow dish for cooling rice
- Small bowl for vinegar water (tezu)
- Plastic wrap (optional, for inside-out rolls)
Step-by-Step Instructions
Preparation Steps (with timing)
Make the Sushi Rice (1 hour total):
- Rinse rice in cold water until water runs clear (3-5 rinses). This removes excess starch for perfectly separated grains.
- Combine rice, water, and kombu in a pot. Let soak 30 minutes for even cooking.
- Bring to a boil over high heat. Once boiling, remove kombu, reduce heat to low, cover, and simmer 15 minutes.
- Remove from heat and let steam, covered, for 10 minutes. Don’t peek – this ensures fluffy rice!
- While rice steams, mix vinegar, sugar, and salt in a small saucepan. Heat gently until sugar dissolves, then cool.
- Transfer hot rice to a large shallow dish. Drizzle vinegar mixture over rice while using cutting motions with your paddle – never stir in circles. Fan the rice as you mix to achieve that glossy restaurant finish.
Cooking Process (with visual cues)
Prepare Your Fillings (15 minutes):
- Cut cucumber into long matchsticks, about ¼-inch thick. Pat dry with paper towels.
- Slice avocado just before rolling to prevent browning. Cut into ½-inch thick strips.
- For Hawaiian style: Slice spam into ¼-inch strips and pan-fry over medium-high heat until edges are crispy and caramelized, about 3-4 minutes per side.
- For spicy tuna: Mix diced tuna with mayo and sriracha until creamy. Taste and adjust heat level.
Roll Your Maki (20 minutes):
- Place bamboo mat on work surface with slats running horizontally. Cover with plastic wrap if desired for easier cleanup.
- Position nori sheet shiny-side down on the mat. Dip hands in tezu (water with splash of rice vinegar) to prevent sticking.
- Spread ¾ cup rice evenly over nori, leaving a 1-inch border at the far edge. Rice layer should be about ¼-inch thick – you should see nori peeking through.
- Create a shallow groove horizontally across the rice, 1 inch from the bottom edge. This helps fillings stay in place.
- Arrange fillings in the groove – don’t overfill! For hosomaki (thin rolls), use just one filling. For chumaki (medium rolls), combine 2-3 ingredients.
- Lift the mat edge closest to you with thumbs while holding fillings in place with other fingers. Roll forward in one confident motion until the mat touches rice on the far side.
- Gently squeeze the mat around the roll to compress, then complete rolling. Give one final gentle squeeze to seal.
How to Know When It’s Done?
Your maki is perfectly rolled when it holds its round shape without gaps between rice and nori. The seam should be on the bottom, creating a smooth surface. When you lift the roll, it should feel firm but not rock-hard. The nori will be slightly damp from the rice moisture – this is exactly what you want for easy cutting.
Pro Chef Tips for Success
Common Mistakes and How to Avoid Them
Rice too mushy? You likely used too much water or over-stirred while adding vinegar. Stick to exact measurements and use cutting motions only. Our rice guide covers perfect grain textures.
Rolls falling apart? Usually means you didn’t press firmly enough while rolling or added too much filling. Start with less filling than you think you need – you can always add more to your next roll.
Nori tearing? This happens with old nori or if rice is too hot. Always use fresh nori stored in an airtight container, and let rice cool to room temperature before rolling.
Make-Ahead and Scaling Guide
Sushi rice can be made 2 hours ahead and kept covered with a damp towel. Never refrigerate rice before rolling – it becomes hard and unworkable. For parties, prep all fillings in advance and set up a rolling station. Double or triple the rice recipe easily, but season in batches for best results. One cup of uncooked rice yields approximately 3 medium rolls.
Troubleshooting Guide
Knife dragging through rolls? Wipe blade with a damp towel between every cut. Some chefs dip the knife in water, but wiping prevents excess moisture.
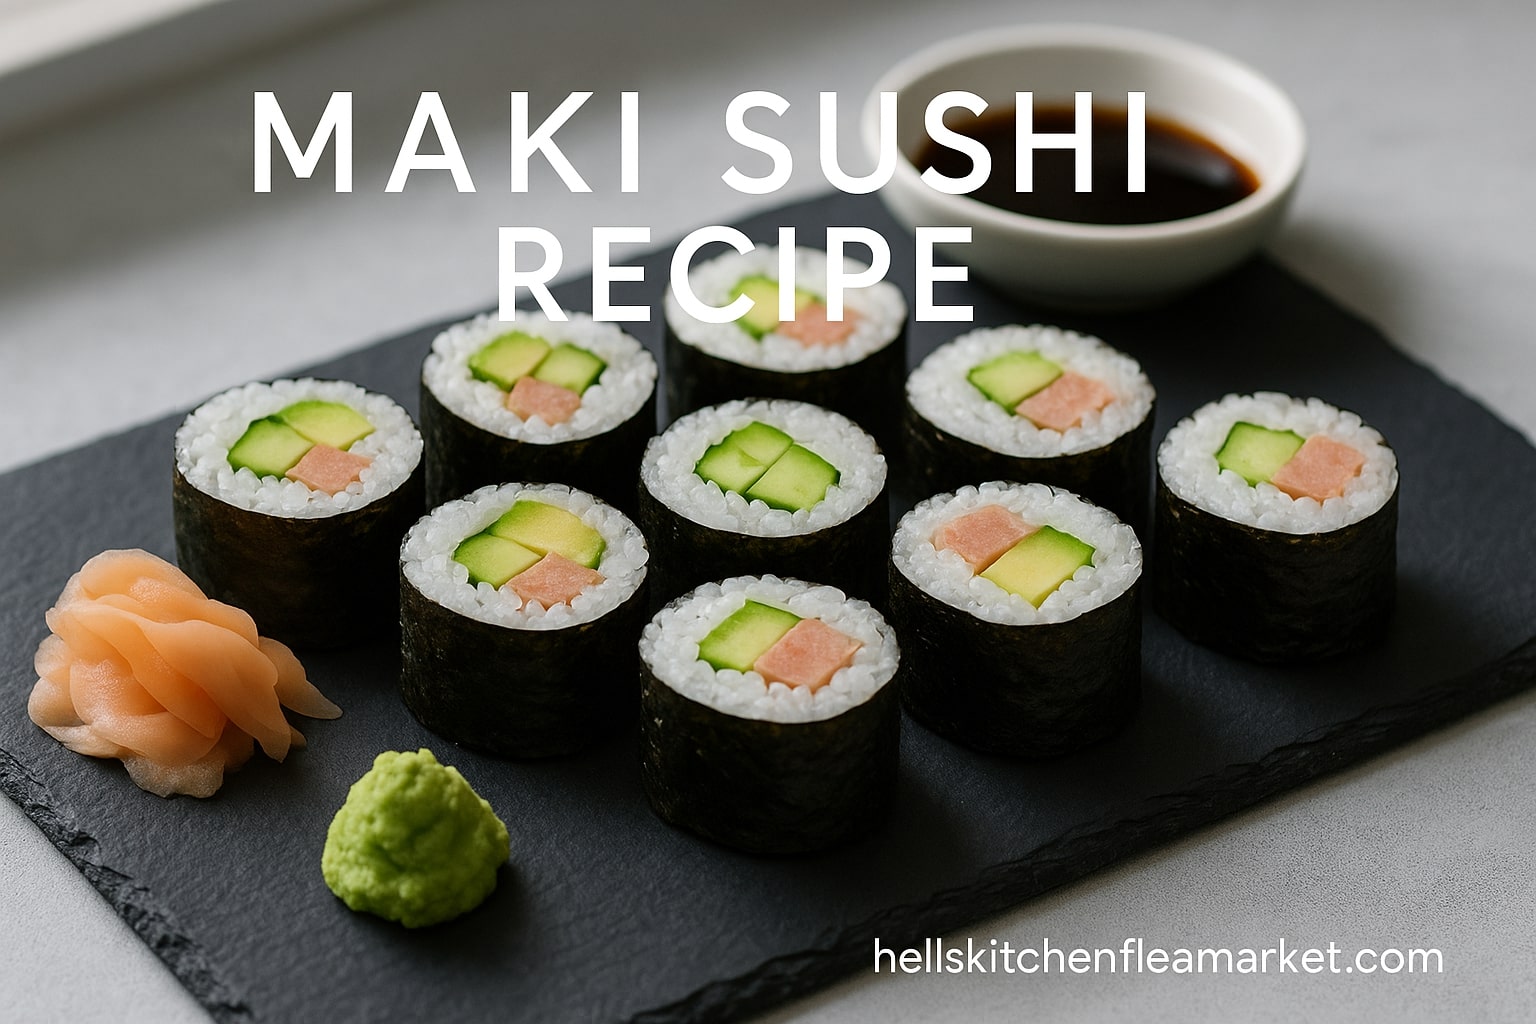
Uneven pieces? Mark your roll lightly with the knife before cutting to ensure equal portions. Standard maki cuts into 6-8 pieces.
Rice sticking everywhere? Your tezu water is your best friend. Re-wet hands between each roll. Adding a teaspoon of rice vinegar to the water helps even more.
Storage and Reheating
Fresh maki tastes best within 2 hours of making. For next-day enjoyment, wrap whole uncut rolls tightly in plastic wrap and refrigerate up to 24 hours. Never store cut pieces – the rice dries out quickly once exposed.
To refresh refrigerated rolls, let them sit at room temperature for 20 minutes before cutting. The nori will soften and rice will regain some moisture. Avoid microwaving, which creates uneven textures and can make nori tough.
For meal prep, consider keeping components separate. Store seasoned rice in an airtight container up to 3 days, and assemble fresh rolls as needed. This method works especially well for Hawaiian-style maki with cooked proteins.
Recipe Variations
Dietary Adaptations
Gluten-Free: Use tamari instead of soy sauce and verify your rice vinegar is gluten-free. All other ingredients naturally fit this diet.
Vegan: Skip the mayo and try our avocado cashew cream for creamy richness. Marinated tofu, roasted vegetables, and pickled radish make excellent protein-rich fillings.
Keto: Replace rice with cauliflower rice seasoned with rice vinegar. Use cucumber ribbons as the outer wrap instead of nori for ultra-low carb “rolls.”
Seasonal Variations
Spring: Feature blanched asparagus spears and our sesame cucumber salad mixture as refreshing fillings.
Summer: Incorporate grilled corn kernels, fresh mango strips, or spicy grilled shrimp for tropical vibes.
Fall: Try roasted sweet potato sticks with a drizzle of spicy mayo, or tempura-fried apple slices for unexpected sweetness.
Winter: Include warm elements like teriyaki mushrooms or cooked salmon for comforting rolls during cold months.
International Twists
Mexican Fusion: Fill with seasoned black beans, avocado, and jalapeño. Serve with chipotle mayo instead of soy sauce.
Mediterranean: Stuff with hummus, roasted red peppers, and cucumber. Drizzle with tahini sauce for serving.
Korean-Style: Add kimchi, bulgogi beef, and julienned carrots. Serve with gochujang mixed into mayo.
Nutritional Benefits
Maki sushi provides a balanced combination of carbohydrates, healthy fats, and protein in every bite. The nori wrapper delivers iodine, iron, and vitamins A and C. When made with brown rice, each roll contains approximately 3 grams of fiber.
Avocado adds heart-healthy monounsaturated fats and potassium. Choose wild-caught tuna for optimal omega-3 fatty acids – about 1,000mg per 3-ounce serving. Even the pickled ginger serves a purpose beyond flavor, aiding digestion between different types of rolls.
For lighter options, cucumber and avocado rolls contain roughly 130 calories per 6-piece serving, while spam or tuna versions range from 200-250 calories. Control portions easily by making hosomaki (thin rolls) instead of futomaki (thick rolls).
Perfect Pairings
Complete your sushi experience with traditional accompaniments and modern twists. Start with classic miso soup or our Thai coconut cucumber salad for a fusion appetizer. Edamame sprinkled with sea salt makes an ideal side dish.
For beverages, green tea cleanses the palate between different roll varieties. Sake served slightly chilled complements the rice beautifully. Non-alcoholic options include ginger beer or sparkling water with cucumber slices.
Create a full Japanese meal by adding chicken yakitori skewers or vegetable tempura. For Hawaiian-style presentation, serve alongside macaroni salad and fresh pineapple chunks. Don’t forget small dishes of soy sauce, wasabi, and pickled ginger for each guest.
Frequently Asked Questions
Can I make maki sushi without a bamboo mat?
Yes! In a pinch, use a clean kitchen towel or even a flexible placemat. The key is having something to help you roll tightly. Some people successfully use parchment paper, though it requires more practice to achieve uniform pressure.
What’s the difference between maki and other sushi types?
Maki specifically refers to rolled sushi with nori on the outside. Uramaki has rice on the outside (like California rolls). Nigiri is hand-pressed rice topped with fish. Temaki are hand-rolled cones. Sashimi contains no rice at all – just sliced raw fish.
How do I find sushi-grade fish?
Look for fish labeled “sushi-grade” or “sashimi-grade” at Japanese markets or quality fishmongers. This indicates it was flash-frozen to eliminate parasites. When in doubt, ask your fishmonger specifically for fish safe to eat raw. Many stores now carry frozen sushi-grade tuna.
Why does my rice turn out too sticky or too dry?
Rice texture depends on three factors: rice-to-water ratio, cooking method, and seasoning technique. Too sticky usually means too much water or over-mixing when adding vinegar. Too dry indicates insufficient water or rice that’s gotten cold. Always use the exact measurements and keep rice covered while working.
Can I prepare maki sushi for a party the night before?
While possible, quality suffers significantly. If you must, wrap whole uncut rolls very tightly in plastic wrap and refrigerate. Cut just before serving and expect slightly tougher nori. Better option: prep all components ahead and host a fun rolling party where guests make their own.
Is it safe to eat raw fish in homemade sushi?
When you purchase properly labeled sushi-grade fish from reputable sources, it’s as safe as restaurant sushi. The flash-freezing process required for this designation kills parasites. Always keep raw fish refrigerated until use and consume within 24 hours of purchase.
What’s the secret to restaurant-style spicy mayo?
Mix 3 parts Japanese mayonnaise (Kewpie brand ideal) with 1 part sriracha. Add a squeeze of lime juice and tiny drizzle of sesame oil. Adjust heat to taste. Some sushi chefs add a touch of honey for balance. Store covered in the refrigerator up to one week.
Final Tips for Maki Success
Remember, your first roll might not be Instagram-perfect, and that’s completely normal! Even experienced sushi chefs say the first roll of the day is practice. Focus on keeping your ingredients at the right temperature – room temperature rice, cold fish, and cool vegetables create the best texture contrast.
Don’t skip the tezu water, and keep a damp towel nearby for wiping your knife. These two simple tools make the difference between frustrating and fun sushi making. Most importantly, have confidence when rolling. A swift, decisive motion creates tighter rolls than tentative movements.
Ready to expand your sushi repertoire? Try our Veggie Sushi with Sunflower Miso Paste for an innovative plant-based option. Whether you stick with classic combinations or venture into Hawaiian fusion territory, homemade maki sushi brings restaurant quality to your kitchen table. Grab your bamboo mat and start rolling – your perfect maki awaits!
Easy Maki Sushi Recipe
Ingredients
Equipment
Method
- Rinse rice in cold water until water runs clear (3-5 rinses). Combine rice, water, and kombu in a pot and let soak for 30 minutes. This soaking ensures even cooking and perfect texture.
- Bring rice to a boil over high heat. Once boiling, remove kombu, reduce heat to low, cover, and simmer for 15 minutes. Remove from heat and let steam, covered, for 10 minutes without peeking.
- While rice steams, mix vinegar, sugar, and salt in a small saucepan. Heat gently until sugar dissolves, then cool. Transfer hot rice to a large shallow dish and drizzle with vinegar mixture while using cutting motions with your paddle. Fan the rice as you mix for that glossy restaurant finish.
- Cut cucumber into long matchsticks about 1/4-inch thick and pat dry. Slice avocado into 1/2-inch strips just before rolling. For Hawaiian style, slice spam into 1/4-inch strips and pan-fry over medium-high heat until edges are crispy, about 3-4 minutes per side.
- Place bamboo mat on work surface with slats running horizontally. Position nori sheet shiny-side down on the mat. Prepare tezu water by mixing water with a splash of rice vinegar in a small bowl.
- Dip hands in tezu water to prevent sticking. Spread 3/4 cup rice evenly over nori, leaving a 1-inch border at the far edge. Rice layer should be about 1/4-inch thick – you should see nori peeking through. Create a shallow groove horizontally across the rice, 1 inch from the bottom edge.
- Arrange fillings in the groove without overfilling. Lift the mat edge closest to you with thumbs while holding fillings in place with other fingers. Roll forward in one confident motion until the mat touches rice on the far side. Gently squeeze to compress, then complete rolling.
- Use a sharp knife wiped with a damp towel between cuts. Cut each roll into 6-8 pieces. Sprinkle with sesame seeds and serve immediately with soy sauce, wasabi, and pickled ginger.